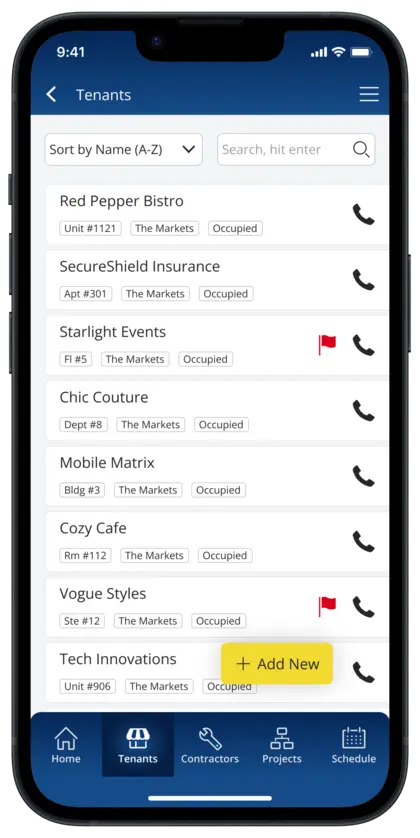
In the Tenants section, you can store your units and active tenants at your property. To navigate to your tenants, click ‘Tenants’ in the menu at the bottom of the screen; or find it in the off-canvas menu by clicking on the menu bars at the top right of the screen.
At the top, you have options to sort the list by the available options in the ‘Sort’ dropdown, or you can start typing in the search bar to filter the list with a search query.
Each block in the list contains the following elements:
Name: The company or individual name of the tenant occupying the unit
Unit Number: The number or ID of the space
Property Name: The name of the property the unit is attached to
Occupancy Status: Displays whether the unit is occupied or vacant
Flag Status: Displays a red flag icon for anyone that is flagged. See Flags for more information
Phone Icon: Click on the phone icon to quickly call the primary phone number of the first person listed in the contacts list
Add Tenants #
To add a tenant, click the floating ‘Add New’ button at the bottom right of the screen. On the next screen, fill in all the details for that tenant, then click ‘Confirm’ to save. If you do not want to save your changes, click ‘Cancel’ to go back to the previous screen.
Delete Tenants #
To delete a tenant or unit, click on the tenant to navigate to the ’Tenants Details’ screen. At the bottom right of your screen click the ‘Delete’ button. When you are prompted to confirm deleting the tenant or unit, click ‘Yes, Delete’ to confirm deletion. Otherwise, click ‘No, go back’ if you do not want to remove the tenant or unit.
**Note: All deletions are permanent and cannot be undone.


